


Hello folks,
I was wondering what to build for this #ChristmasHackathon & I thought why not build something which brings us closer to our dearest Hashnode.
Introducing Hashnode Daily - a chrome extension which makes Hashnode's featured articles for the day just a click away.

Available on Chrome Web Store - Download
Let's walk through the whole process to build this extension.
Getting Started
To start, create a new directory to hold the extension's files.
Create the manifest
Create a file called manifest.json in the project directory. This serves a similar purpose to a package.json, it provides the Chrome Web Store with critical information about the project, including the name, version, the required permissions, and so forth.
//manifest.json
{
  "name": "Hashnode Daily",
  "version": "1.0",
  "description": "Get featured articles for the day. Powered by Hashnode API.",
  "background": [
    {
      "scripts": ["background.js"]
    }
  ],
  "browser_action": {
    "default_popup": "popup.html",
    "default_icon": {
        "16": "icons/logo-16.png",
        "32": "icons/logo-32.png",
        "48": "icons/logo-48.png",
        "128": "icons/logo-128.png"
      }
  },
  "icons": {
    "16": "icons/logo-16.png",
    "32": "icons/logo-32.png",
    "48": "icons/logo-48.png",
    "128": "icons/logo-128.png"
  },
  "manifest_version": 2
}
The name and description can be anything you’d like. Registering a background script in the manifest tells the extension which file to reference, and how that file should behave. Use browser_action to put icons in the Google Chrome toolbar, to the right of the address bar. In addition to its icon, a browser action can have a tooltip, a badge, and a popup. Extensions also display images on the extension management page, the permissions warning, and favicon. These images are designated in the manifest under icons. The manifest_version specifies the version of the manifest file format your package requires.
The permissions depend on what the extension needs to do. We have no permissions in this extension. A list of all of the permissions and what they mean can be found here.
Adding a popup
If the extension needs to make use of a popup that comes off the extension icon, it’s thankfully fairly straightforward. After designating the name of the file with browser_action in the manifest file, a page can be built with whatever HTML and CSS you’ll like to include.
<!--popup.html-->
<!DOCTYPE html>
<html>
  <head>
    <link rel="stylesheet" href="popup.css">
  </head>
  <body>
    <nav>
      <img src="icons/custom-logo.svg" alt="logo">
    </nav>
    <div id="preloader">
      <div id="loader"></div>
    </div>
    <ul id="list"></ul>
    <footer>
      <h3>Powered by <a href="https://api.hashnode.com/" target="_blank">Hashnode API</a></h3>
    </footer>
    <script src="background.js"></script>
  </body>
</html>
In the above file, we have a fixed nav at the top with a custom-designed logo. Then we have our preloader-custom loading animation which is made to disappear when our data loads. The ul tag is populated using javascript. At the bottom, we have the footer which acknowledges & credits the Hashnode API.
Stylesheet for our popup.html:
/*popup.css*/
* {
    padding: 0;
    margin: 0;
    box-sizing: border-box;
    font-family: sans-serif;
    color: #0c0a0a;
}

html {
    width: 350px;
}

body {
    background-color: #f1f1f1;
}

nav {
    display: flex;
    position: fixed;
    top: 0;
    justify-content: start;
    align-items: center;
    width: 100%;
    background-color: #ffffff;
}

nav img {
    width: 42px;
    margin-left: 12px;
    background-color: #f1f1f1;
}

#preloader {
    width: 100%;
    margin-top: 80px;
    display: flex;
    justify-content: center;
    align-content: center;
}

#loader {
    display: block;
    margin: 8px;
    height: 40px;
    width: 40px;
    border: 8px double #ffffff;
    border-radius: 50%;
    border-top: 8px double #2962ff;
    border-bottom: 8px double #2962ff;
    -webkit-animation: spin 2s linear infinite;
    animation: spin 2s linear infinite;
}

@-webkit-keyframes spin {
    0%{
        -webkit-transform: rotate(0deg);
        transform: rotate(0deg);
    }
    100%{
       -webkit-transform: rotate(360deg);
       transform: rotate(360deg);
    }
}

 @keyframes spin {
     0%{
         -webkit-transform: rotate(0deg);
         transform: rotate(0deg);
     }
     100%{
        -webkit-transform: rotate(360deg);
        transform: rotate(360deg);
     }
 }

 ul {
    margin-top: 50px;
 }

li {
    margin: 8px;
    padding: 4px;
}

li img {
    width: 100%;
    height: 200px;
    margin-bottom: 2px;
    border-radius: 5px;
}

li h2 {
    font-weight: 400;
    font-size: 16px;
}

li h3 {
    font-weight: 300;
    color: grey;
    font-size: 12px;
}

footer {
    width: 100%;
    background-color: #ffffff;
}

footer h3 {
    padding: 4px 2px;
    text-align: center;
    font-weight: 400;
}

footer h3 a {
    color: #2962ff;
}
Popup functionality
We need to add some functionality to our popup. Make sure the JavaScript file is designated in the manifest file and is linked up in your popup file as well, like this: <script src="background.js"></script>.
//background.js
document.addEventListener("DOMContentLoaded", () => {
  let articles = [];
  //Fetching the featured articles for the day
  fetch(
    "https://api.hashnode.com/?query={storiesFeed(type:%20FEATURED){title,author{username},coverImage,slug,dateFeatured}}"
  )
    .then(function (response) {
      return response.json();
    })
    .then(function (data) {
      articles = data.data.storiesFeed;
      document.getElementById("preloader").style.display = "none";
      createList(articles);
    })
    .catch(function (e) {
      console.log(e);
    });
  //

  //creating list
  function createList(articles) {
  let list = document.querySelector("#list");
  for(let i = 0; i < articles.length; i++) {
    let listItem = document.createElement("li");
    let imgCover = document.createElement("img");
    articles[i].coverImage != ""?imgCover.src = articles[i].coverImage:imgCover.src = "images/no-img.png";
    let title = document.createElement("h2");
    title.appendChild(document.createTextNode(articles[i].title));
    let author = document.createElement("h3");
    author.appendChild(document.createTextNode(articles[i].author.username));
    let anchor = document.createElement("a");
    anchor.href = `https://${articles[i].author.username}.hashnode.dev/${articles[i].slug}`;
    anchor.target = "_blank";
    anchor.appendChild(title);
    listItem.appendChild(imgCover);
    listItem.appendChild(anchor);
    listItem.appendChild(author);
    list.appendChild(listItem);
  }}
});
In the above file, we start by writing the event listener for the event DOMContentLoaded so that we have access to the popup DOM. We will write our entire logic inside it. Next, we are going to fetch the Hashnode's featured articles using the query:
{
  storiesFeed(type: FEATURED){
    _id
    title
    author{
      username
    }
    coverImage
    slug
    dateFeatured
  }
}
The equivalent request URL:
https://api.hashnode.com/?query={storiesFeed(type:%20FEATURED){title,author{username},coverImage,slug,dateFeatured}}
Next, we are using the response to create HTML elements using document.createElement() & populating the ul tag.
Our Extension is ready.
Debugging
Head over to chrome://extensions/ from the browser’s address bar and enable developer mode. That activates the Load unpacked button to add the extension files.
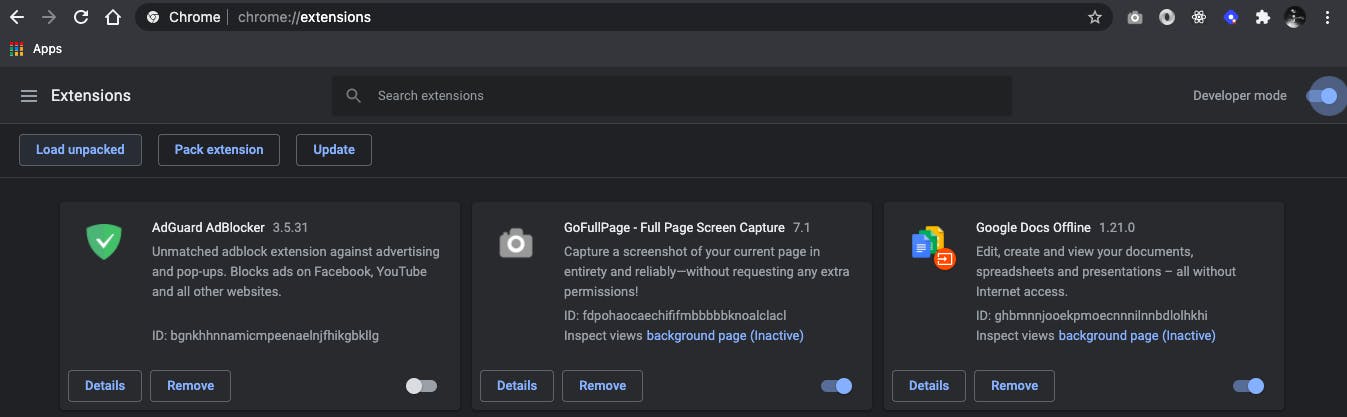
The extension needs to be reloaded from this interface when it is updated. A little refresh icon will display on the screen. Also, if the extension has any errors during development, it will show an error button with a stack trace and more info here as well.
Submitting to the Chrome Web Store
Head over to the Chrome Web Store Developer console to submit the extension. Click the New Item button, then drag and drop the zipped project file into the uploader. Chrome will ask a few questions about the extension, request information about the permissions requested in the extension. Submit the extension & wait for them to review it.
That’s it! I would like to thank Hashnode Team for coming up with this hackathon. It felt really good to explore something new & share it with you all.